To link your Bing advertising account with Shoplytics, please log in to Shoplytics and to Microsoft Ads.
Step 1: Enter Tracking ID in Shoplytics
In the navigation, click on "Conversions" --> "UET Tag" and copy the displayed Tag ID. You may need to first create a new UET tag on this screen in order to receive an ID.
You can then enter the UET Tag ID in Shoplytics under "Other Pixels" --> "Microsoft UET Tag ID".
In addition, also enter your "Microsoft Ads Advertising Account ID" in Shoplytics, which you can find at the top left in Microsoft Ads.
Step 2: Create a Conversion Goal for Purchases
In the Microsoft Ads navigation, click on "Conversions" --> "Conversion goals"
Create a new goal and select "Business Website", then "Manual Setup".
As the category, select "purchase" and click on "Event" below.
Now you can give the goal a name, e.g. "Sale Shoplytics", and select the correct currency.
You can activate Enhanced Conversions and click next.
When asked about the UET tag, select "Yes the UET-tag was already installed on all website pages..."
In the next step, click on "manual installation" and select at the bottom "Track event on inline action".
DONE
Step 3: Connect Conversions API for server-side tracking (required for Shopify, optional for all other systems)
In the Microsoft Ads navigation, click on "Conversions" and search for "Conversions API". If you cannot find it, contact Microsoft Ads support using the following template:
Hello Microsoft Advertising Team,
We are actively using Microsoft Ads and would like to participate in the pilot phase of the Conversions API (for server-side UET tracking).
Please let us know briefly once the button to generate access tokens has been enabled for us.
Currently we can only generate developer tokens in the UI, which unfortunately do not work with the new Conversions API.
Thank you and best regards
As soon as your Microsoft Ads interface shows the button to generate the token for the Conversions API, click it and enter the token at app.shoplytics.de under "Other Pixels".
In the field above, also enter the advertising account ID. (ATTENTION: This is not the ID you see at the top left in Microsoft, but rather you will find the parameter "cid=" in the address bar of your browser, followed by the numeric advertising account ID. This is what must be entered in Shoplytics.)
From now on, no Microsoft Ads pixel will be executed by Shoplytics in the browser; instead, the Shoplytics tracking server communicates directly with the Microsoft server when new events are tracked.
Step 4 (optional): Create Retargeting Audiences
Shoplytics already sends all the necessary data. Now you need to make sure in Bing Ads that the transmitted data can also be used for retargeting.
To do this, create "Audience" lists in Bing Ads.
In the following, I'll show you the setup using the example of "view_item" (product page view).
You then repeat the exact same procedure for all relevant Ecom events:
view_item (Product page view)
add_to_cart (Added to cart)
begin_checkout (Start checkout process/Go to checkout)
purchase (Purchase)
Instructions
Click on "Tools" and then on "Audiences"
Enter the name: e.g. "Shoplytics view_item (Product page viewed)" Select "Remarketing List" as the option:
Select the "UET" tag from the dropdown menu (If you have several, it must be the one connected to Shoplytics.)
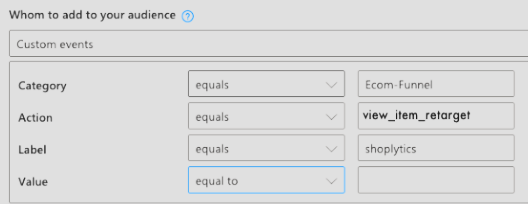
And for "who do you want to add to the list", select "Custom Events"
In the input form, apply these settings:
(You will adjust the "Action" for each individual event - according to the event you are currently setting up). "Category" and "Label" remain exactly the same.
You can ignore the code shown below (you don't need to copy or email it -> Shoplytics has already taken care of everything for you).
You can still change the "Duration", i.e. how long individual visitors remain in the list (after their action in the shop). With this you determine: a) how long you can contact visitors (after their action in the shop) via your retargeting campaigns. b) how "current" the action is for the visitor - and how relevant your ads will be to the visitor accordingly. Here you need to find a happy medium between: a) "I want to stay in contact with the visitor for as long as possible in the future" and b) "a visitor who saw a product 6 months ago surely has less interest in your ads than one who last saw a product in your shop 3 days ago"
TikTok Ads
To connect Shoplytics with your TikTok advertising account, log in to TikTok Ads and go to Events Manager --> datasources
Copy the displayed Pixel ID or create a new pixel and then copy the ID.
Here you will find the "TikTok ID" field where you can paste the copied ID. (Make sure that no space has been inserted!)
OPTIONAL: Connect TikTok Conversion API (server-side tracking)
Please create a TikTok API key and send it to data@shoplytics.io so that a technician can activate the API for you.
How do I create an API key?
In the TikTok Events Manager, click on the pixel and then on "settings".
Scroll to the "Access Token Generation" section and click the button to generate a key.
Pinterest Ads
To connect Shoplytics with your Pinterest ad account, log in at https://ads.pinterest.com/ and navigate through the menu to "Conversions" --> Pinterest tag --> Tag health.
Enter the copied number under "Pinterest Pixel ID"
Connect Pinterest Conversion API (server-side tracking)
To do this, please generate an access token and send it to data@shoplytics.io so that a technician can activate the API. Please also include your ad account number in this email.
How do I generate an access token?
In Pinterest, go to "Conversions" --> Conversion API --> Set up API
Click on "Generate new token"
AWIN
To link Shoplytics with AWIN, you need your AWIN Merchant ID (merchant ID).
Simply send this merchant ID by email to support@shoplytics.de.
We will activate the AWIN integration within a few days.
Microsoft Clarity
By default, we create a new property in Microsoft Clarity during the setup of Shoplytics and invite you to this property.
Clarity tracking is therefore automatically active through Shoplytics.
However, if you have already used Clarity before and would like to continue using your old property with Shoplytics tracking, simply send us your property ID from Microsoft Clarity to data@shoplytics.io.
We will then connect this property with Shoplytics.
Meta Ads / Facebook Ads
Important note:
We strongly recommend creating a new pixel rather than connecting your old pixel to Shoplytics. Otherwise, duplicate events and issues with the campaign algorithm may occur.
If you are sure that you want to use your old pixel, you can simply skip the first steps of this guide. But you can't go wrong with a second pixel.
Instructions:
Log in to your Business Manager at business.facebook.com. (If you don't have a business account yet, you can create one on this page. Your ad account and pixel are just "assets" that sit within your business account.)
On the left, click "All Tools" --> "Events Manager" and then click "Data Sources"
Click the green "+ Connect Data" at the top left to create a new data source.
Select "Web" as the type
Enter the domain followed by "Shoplytics" as the name.
In the next step, Facebook will offer you implementation instructions. You can ignore and close this.
Click on Settings at the top right
Copy the "Dataset ID"
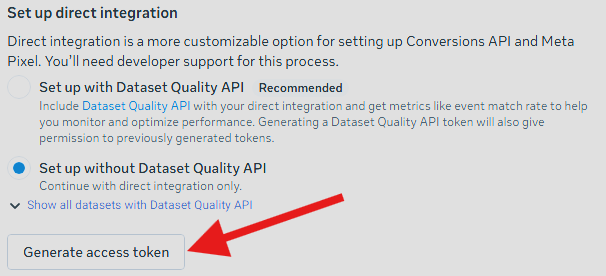
Scroll down to "Set up direct integration" and generate an access token without "Dataset Quality API"
Send these two pieces of information to data@shoplytics.io so we can activate the integration.
In the pixel settings, also click "Share with ad account" so that the audiences work.
Enabling error monitoring:
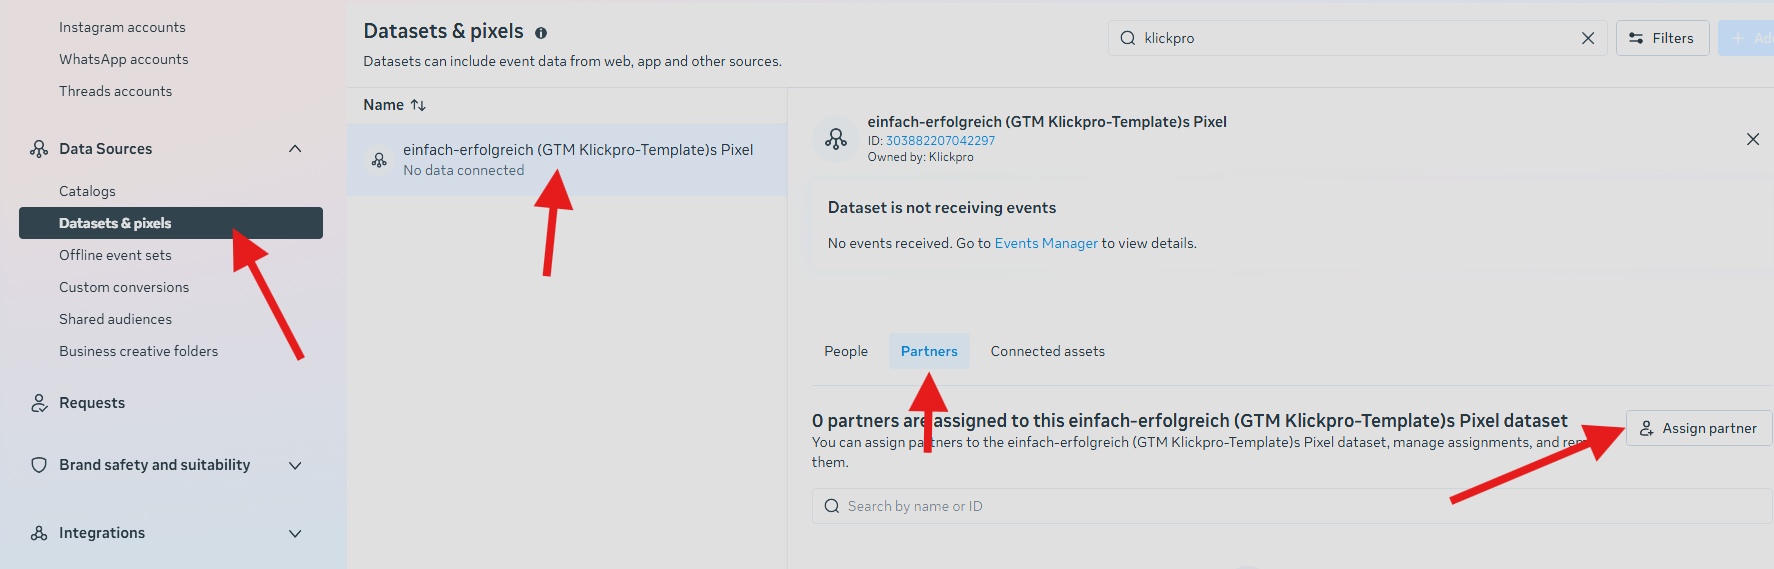
So that we can check whether the pixel is being supplied with data correctly, you should definitely also grant the Shoplytics team access to the pixel and the ad account.
To do this, simply go to Business Settings --> Datasets --> Assign Partners --> grant access to business ID 1800068976920756.
Google Merchant Center
Log in to Google Merchant Center and make sure that the correct merchant profile is selected in the top right.
Go to the bottom left to Settings --> Access and services
Click the upper "Add person" button and add data@shoplytics.io.
For the permissions, you can leave the default settings and submit.