# Shopify
### Step 1
1. **Open the Shopify administration area**
2. In the left navigation, click on "Online Store" --> "Themes"
[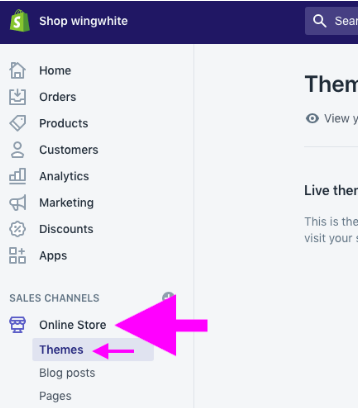](https://docs.shoplytics.de/uploads/images/gallery/2026-04/K2Y3SPDmvhUPuOEz-image.png)
3. then in the top right (on your active theme) click on "Actions" and then on "Edit Code"
[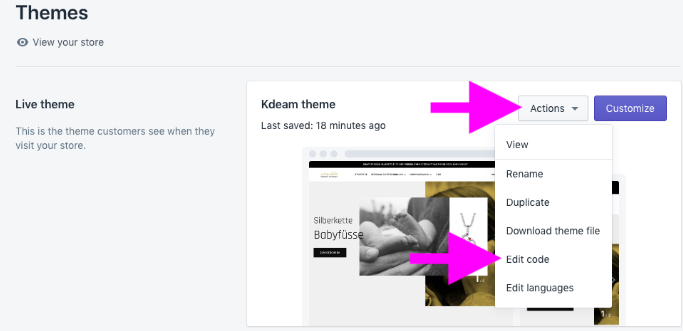](https://wiki.shoplytics.io/index.php?title=Datei:Shopify-2.png)
4. then under "Layout" > click on "theme.liquid"
5. On the right side of the source code, find the line with: <head>
[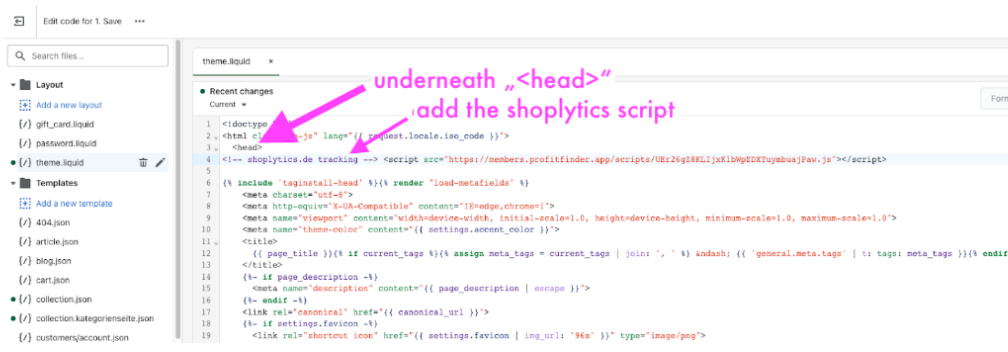](https://docs.shoplytics.de/uploads/images/gallery/2026-04/ipRCrxHG7bTQ2xkW-image.png)
6. Now insert the Shoplytics script you received by email directly BELOW the <head> line
### Step 2
1. In Shopify, go to Settings at the bottom left and then to Customer Events
2. Click on "Custom Pixels" and "Add Custom Pixel" and enter "Shoplytics"
3. At the very top, 2 privacy settings must now be configured. Due to the structure of the Shoplytics API, you can select the two "most lenient" options here
[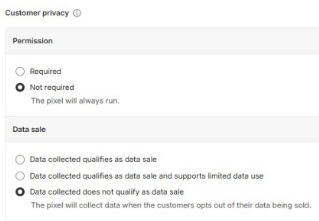](https://docs.shoplytics.de/uploads/images/gallery/2026-04/pOWzMTFWMUt3SvTD-image.png)
4. At the very bottom, insert a code. Please click on the following link to see the code and copy the code 1:1: [http://shoplytics.de/shopify-pixel](http://shoplytics.de/shopify-pixel) (After inserting, Shopify will display a warning... You can ignore it. The code is correct.)
5. Now "save" **and then click on "connect"**
**Congratulations! Done.** Now please let our team know that you have set everything up.
## If your Shopify statistics suddenly no longer count all visitors because the consent banner does not communicate with Shopify...
**Problem:**
As long as the consent banner is built in via Shopify plugins, etc., Shopify itself is notified in most cases when a user accepts the consent.
However, if you implement the consent banner differently, Shopify "loses" this direct connection and integration with the consent banner. As a result, Shopify assumes that NO consent has been given — and is therefore only allowed to record its own statistics in a reduced manner. This is why you see a sudden loss of sales data in your Shopify statistics.
**Solution:**
In order to give Shopify a clear indication that the statistics in your Shopify dashboard may continue to be displayed, you need to add the following code under "Custom Scripts" in the Shoplytics admin area.
However, make sure that this command is only actually executed when your visitors' consent is given: To do this, activate the option: "Comply with GDPR and only trigger when consent exists"
With the following command you can (e.g. enter in the browser console) find out whether the consent has been changed accordingly: