To link your Bing advertising account with Shoplytics, please log in to Shoplytics and to Microsoft Ads.
Step 1: Enter Tracking ID in Shoplytics
In the navigation of Microsoft Ads, click on "Conversions" → "UET Tag" → "Create"
Give the pixel any name you like and enter "Shoplytics" in the description so you can identify it later.
On the next page, select "Use Conversions API"
Copy the displayed token and enter it on app.shoplytics.de under "Other Pixels" → "Microsoft Conversion API Token"
Switch back to Microsoft Ads and look for the parameter "cid=" in the address bar. Copy the number that follows the "=" and enter it in Shoplytics under "Microsoft Ad Account ID" (Important: This is not the ad account ID you see in the interface, but the CID from the address bar)
Switch back to Microsoft Ads and go to "Conversions → UET Tag → All Tags" and copy the Tag ID of the tag you just created from the table. Enter this ID in Shoplytics under "Microsoft UET Tag ID"
Step 2: Create a Conversion Goal for Purchases
In the Microsoft Ads navigation, click on "Conversions" --> "Conversion goals"
Create a new goal and select "Business Website", then "Manual Setup".
As the category, select "purchase" and click on "Event" below.
Now you can give the goal a name, e.g. "Sale Shoplytics", and select the correct currency.
You can activate Enhanced Conversions and click next.
When asked about the UET tag, select "Yes the UET-tag was already installed on all website pages..."
In the next step, click on "manual installation" and select at the bottom "Track event on inline action".
DONE
Step 3 (optional): Create Retargeting Audiences
Shoplytics already sends all the necessary data. Now you need to make sure in Bing Ads that the transmitted data can also be used for retargeting.
To do this, create "Audience" lists in Bing Ads.
In the following, I'll show you the setup using the example of "view_item" (product page view).
You then repeat the exact same procedure for all relevant Ecom events:
view_item (Product page view)
add_to_cart (Added to cart)
begin_checkout (Start checkout process/Go to checkout)
purchase (Purchase)
Instructions
Click on "Tools" and then on "Audiences"
Enter the name: e.g. "Shoplytics view_item (Product page viewed)" Select "Remarketing List" as the option:
Select the "UET" tag from the dropdown menu (If you have several, it must be the one connected to Shoplytics.)
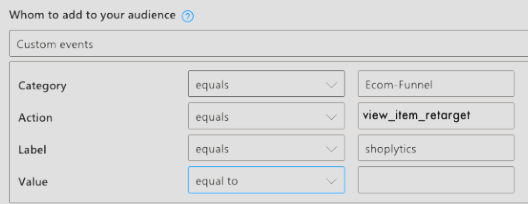
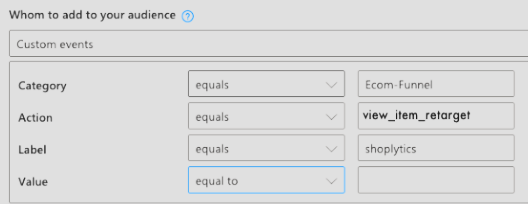
And for "who do you want to add to the list", select "Custom Events"
In the input form, apply these settings:
(You will adjust the "Action" for each individual event - according to the event you are currently setting up). "Category" and "Label" remain exactly the same.
You can ignore the code shown below (you don't need to copy or email it -> Shoplytics has already taken care of everything for you).
You can still change the "Duration", i.e. how long individual visitors remain in the list (after their action in the shop). With this you determine: a) how long you can contact visitors (after their action in the shop) via your retargeting campaigns. b) how "current" the action is for the visitor - and how relevant your ads will be to the visitor accordingly. Here you need to find a happy medium between: a) "I want to stay in contact with the visitor for as long as possible in the future" and b) "a visitor who saw a product 6 months ago surely has less interest in your ads than one who last saw a product in your shop 3 days ago"