Once you’ve completed these steps, we can begin setting up your advanced tracking. If you have any questions or encounter any issues, please contact us at onboarding@shoplytics.co.uk
1. DNS Entry
This step is not strictly required, but it affects the quality of tracking. With first-party tracking, Shoplytics is no longer blocked by ad blockers and tracking blockers.
To enable first-party tracking, please log in to your domain provider and create a new DNS entry for the desired domain with the following settings...
Type: CNAME
Name: stream
Value: 1p.shoplytics.de
What does this entry do?

This defines a new subdomain "stream." for your domain.
All data sent to this subdomain is automatically forwarded to
the Shoplytics tracking server. This way, no third-party domain
appears in the browser console when someone visits the website.

If you have trouble creating the entry, you can simply send
the login credentials for your domain provider to
data@shoplytics.io and we will set up the entry for you.
IMPORTANT: If you use Cloudflare and set up the CNAME entry there, be sure to enable the "DNS only" option so that the Cloudflare "Proxy" is not used. Otherwise, this would cause tracking errors.
2. Google Search Console
Please verify your website in the Google Search Console and grant us access...
In the right box (URL prefix), enter the link to your website (with HTTPS)
Google will now show you a list of methods to verify the site. The "HTML tag" method is the easiest. Then click Confirm.
If a green message appears, or if the Search Console was already verified previously, you can go to the settings on the left and, under "Users and permissions", add the address data@shoplytics.io (permission: full)
3. Google Tag Manager
So that, after successful setup, we can integrate all your tracking pixels into Shoplytics, please grant us access to your Google Tag Manager. If you don't use Google Tag Manager, you can skip this step.
Simply include the relevant information in the email in the next step so that we can activate everything right away.
7. Send email
Now send an email with the subject "Shoplytics access" to setup@shoplytics.io and replace the bold sections with your details, where applicable:
Hello,
I have granted the access.
Domain: your-domain.com
Shop system: none / Shopify / …
Google: your login address on google.com
Google Ads: 10-digit ad account ID
Meta Ads: Pixel ID & API token
Additional services: enter IDs, if available
Integrate Shoplytics into your shop system
Integrate Shoplytics into your shop system
Shopify
Step 1
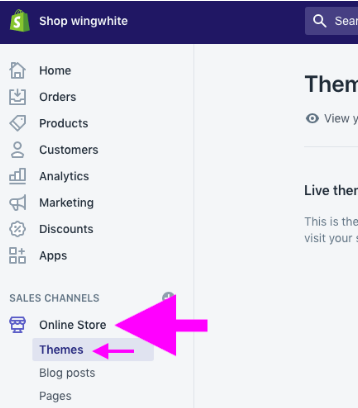
Open the Shopify administration area
In the left navigation, click on "Online Store" --> "Themes"
then in the top right (on your active theme) click on "Actions" and then on "Edit Code"
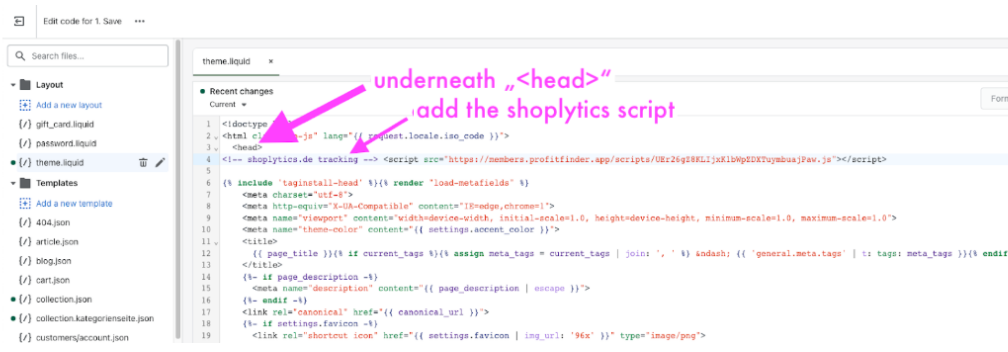
then under "Layout" > click on "theme.liquid"
On the right side of the source code, find the line with: <head>
Now insert the Shoplytics script you received by email directly BELOW the <head> line
Step 2
In Shopify, go to Settings at the bottom left and then to Customer Events
Click on "Custom Pixels" and "Add Custom Pixel" and enter "Shoplytics"
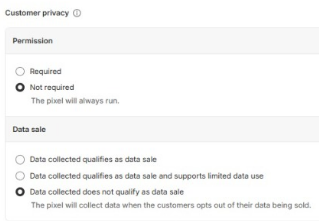
At the very top, 2 privacy settings must now be configured. Due to the structure of the Shoplytics API, you can select the two "most lenient" options here
At the very bottom, insert a code. Please click on the following link to see the code and copy the code 1:1: http://shoplytics.de/shopify-pixel (After inserting, Shopify will display a warning... You can ignore it. The code is correct.)
Now "save" and then click on "connect"
Congratulations! Done. Now please let our team know that you have set everything up.
If your Shopify statistics suddenly no longer count all visitors because the consent banner does not communicate with Shopify...
Problem:
As long as the consent banner is built in via Shopify plugins, etc., Shopify itself is notified in most cases when a user accepts the consent.
However, if you implement the consent banner differently, Shopify "loses" this direct connection and integration with the consent banner. As a result, Shopify assumes that NO consent has been given — and is therefore only allowed to record its own statistics in a reduced manner. This is why you see a sudden loss of sales data in your Shopify statistics.
Solution:
In order to give Shopify a clear indication that the statistics in your Shopify dashboard may continue to be displayed, you need to add the following code under "Custom Scripts" in the Shoplytics admin area.
However, make sure that this command is only actually executed when your visitors' consent is given: To do this, activate the option: "Comply with GDPR and only trigger when consent exists"
With the following command you can (e.g. enter in the browser console) find out whether the consent has been changed accordingly:
Integrate the Shoplytics script (which you received from us via email) into the <head> section of the shop.
Preferably at the very top of the head section for best results. Please do not use "defer" or "async", as we manage the loading time of the tracking script proactively directly via Shoplytics. If you're not sure how to place the script in the head section (or don't have a developer who can do it), simply download the Shoplytics plugin for Shopware 5 or 6, which will then place the script in the perfect spot for you - without you having to click around in the source code.
If you cannot place the script directly in the source code (which is the preferred recommendation), you can install the Shoplytics plugin for your Shopware version... (only necessary if you cannot/do not want to manually insert the script into the head section of your shop)
The plugin must be added to Shopware via "Upload".
Enter your tracking URL in the plugin settings (you received this via email.)
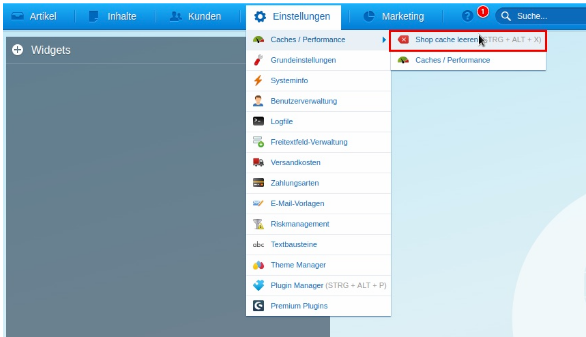
Remember: "Clear Shopware cache" (only then will the changes be displayed to your visitors and data be collected), see screenshot below
If needed, you can now also activate Dynamic Retargeting in Shopware...
In dynamic retargeting, the user's actions are passed on to Google Ads.
This way, following the shop visit, the user sees the appropriate advertisements for exactly the product they were interested in in the shop.
The Google Ads algorithm distinguishes between product page views, opened shopping carts, and purchases.
To achieve this, the IDs of the products communicated to Google via the Google Shopping feed must exactly match the product IDs used in the tracking.
Unfortunately, this is not always the case. Especially when the Shopping feed "pulls" the product ID from a different field in the Shopware database than the tracking system in the browser.
To check whether the IDs in the Google Shopping feed exactly match the IDs in the browser, we have prepared a small tool for you.
If the IDs in the Shopping feed (left table) do not exactly match those in the right table (browser/tracking) (Attention: case sensitivity also counts), then you must adjust the Shopping feed export as follows:
Step 1: Check which DataLayer version is active in your shop.
To do so, please open a PRODUCT DETAIL page in your shop and add the parameter ?datalayer=1 to the URL.
→ A large yellow window will open. It shows the version of your Datalayer.
Step 2: Depending on the version of your Datalayer, you must adjust the Shopping feed so that the product ID (article ID) is pulled from the following field.
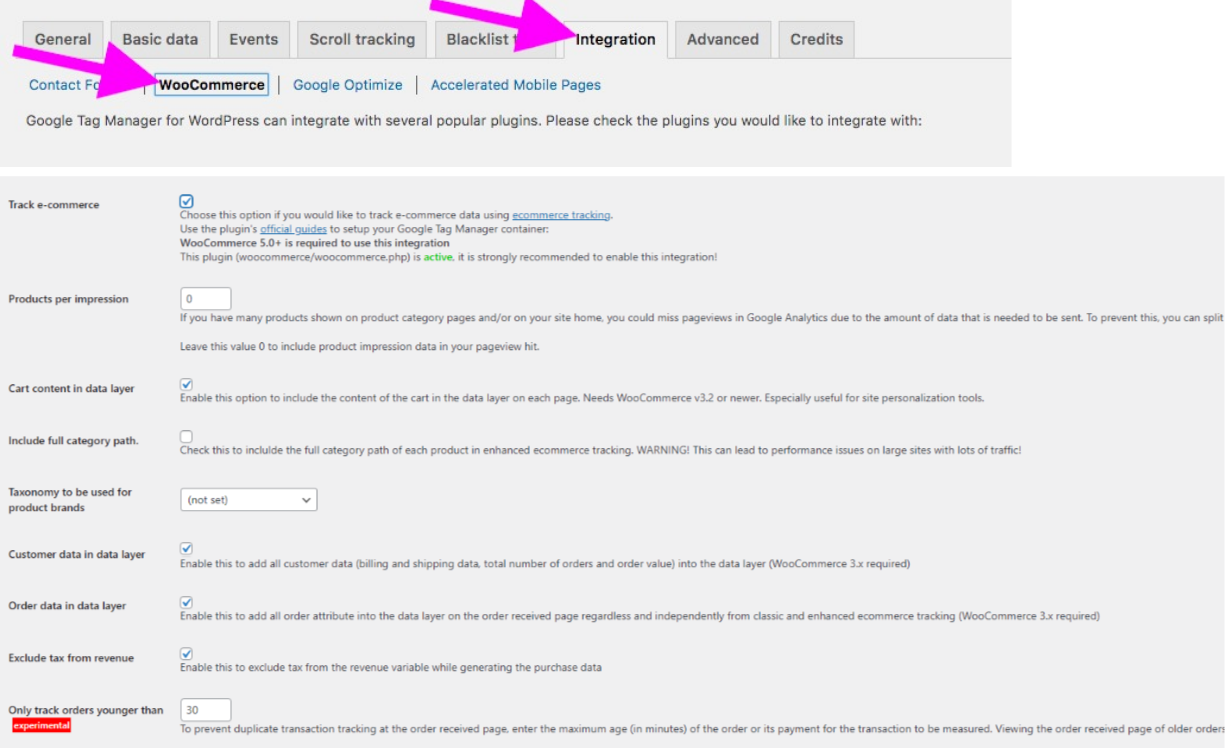
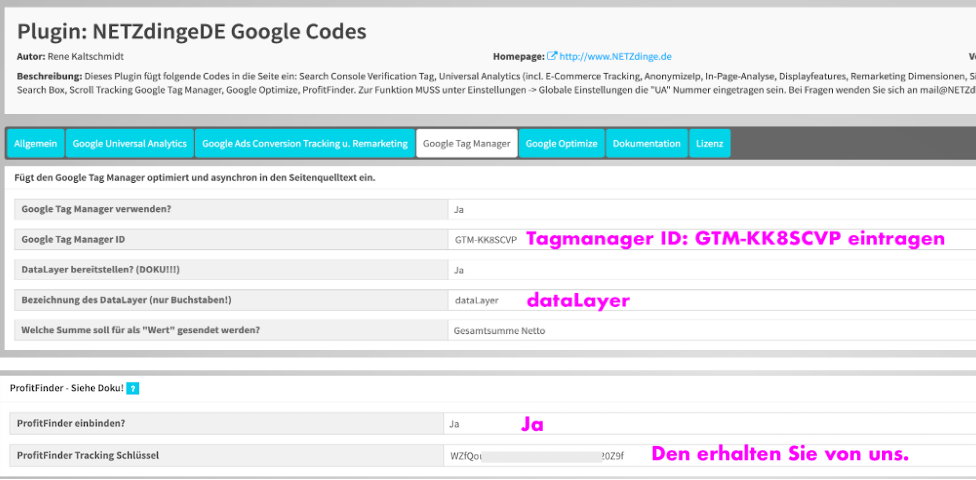
Open the plugin settings, enter the Google Tag Manager ID GTM-KK8SCVP and set Container Mode to ON below.
Then configure everything as follows
Embed the Shoplytics script
You will find the Shoplytics script in the last email you received from us. This must be embedded in the head section of the page. For this we recommend the free WordPress plugin "Tracking Code Manager"
a. After you have installed the Tracking Code Manager, go to Settings → Tracking Code Manager in WordPress.
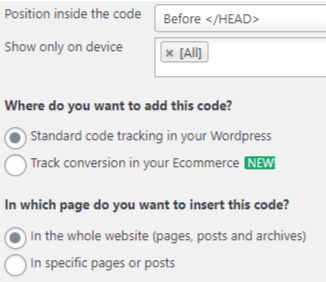
b. There, create a new tracking code, enter "Shoplytics" in the title and paste the Shoplytics script into the grey box. (Please paste it exactly as it appears in the email. Please do not click on the link contained in the script and insert the content. That would destroy your website. Please simply copy the script 1:1 from the email and insert it exactly as is.)c. Below the script, configure the settings as follows:
Only if you use the "WP-Rocket" plugin In order for the tracking code to load without errors in this case, you need to extend the Shoplytics script you received from us with the following code snippet. Insert the bold part at the same position in your script. Example code (only copy the bold part and add it to your script): <script src="https://app.shoplytics.de/0000000.js" data-cfasync="false"></script> If you have any problems with this, you can simply write to us stating that you use WP-Rocket, and we will adjust the script for you.
Only if you use the "Borlabs Cookie" consent manager In the Borlabs settings, an exception for https://tagmanager.google.com/ must be added in the "Script Blocker" tab, otherwise Shoplytics tracking will be blocked directly, even when cookies have been accepted. (If this is unclear, just send an email to Marco: technik@shoplytics.de) Through the exception in the script blocker, Shoplytics can be loaded immediately, and Shoplytics then checks whether tracking may be active or not. If the entire script blocker is disabled on your site, then no exception needs to be added.
Load time optimization
Shoplytics helps you optimize the load time of your shop.
Ideally, Shoplytics serves the "GTM" (Google Tagmanager code) itself instead of having GTM4WP deliver it.
→ If in the page-speed test: https://pagespeed.web.dev, the "GTM-KK8SCVP" is shown as render-blocking, proceed as follows:
Change two settings in the GTM4WP plugin...
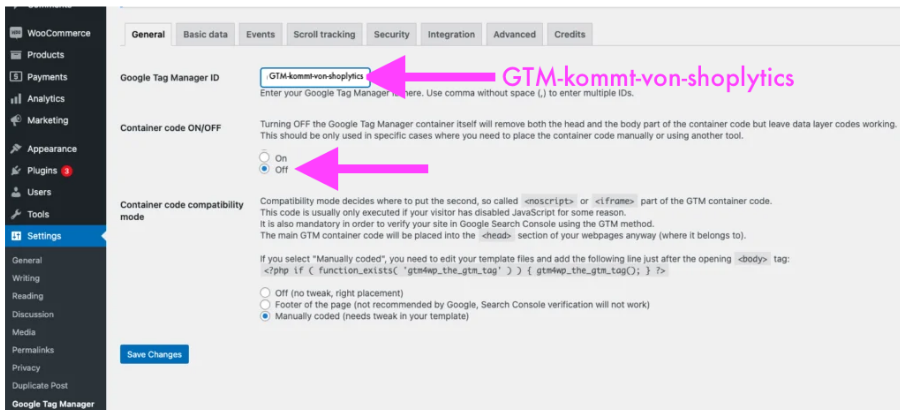
Instead of the GTM ID, enter the following in the "Google Tag Manager ID" field: GTM-EMPTY
Under "Container code ON/OFF" select the setting "OFF"
Change the setting in app.shoplytics.de/einstellungen In order for Shoplytics to deliver the Google Tagmanager in a load-time-optimized way, you must set the "Shop system" in Shoplytics to "Self-programmed". This way, Shoplytics knows that the GTM is not provided by the plugin, but that Shoplytics has to provide it.
Integrate Shoplytics into your shop system
Plentymarkets
You have received a tracking code from us via email. Please insert it into the head section of the shop.
Once the code is in the shop, please send a short email to data@shoplytics.io. We will then ensure that all ecommerce events can be tracked.
Integrate Shoplytics into your shop system
Oxid
You have received a tracking code from us via email. Please insert it into the head section of the shop.
Once the code is in the shop, please send a short email to data@shoplytics.io. We will then make sure that all ecommerce events can be captured.
Integrate Shoplytics into your shop system
Magento
Step 1
Insert the Shoplytics script in the head section of the website. You have received this from us by email.
Step 2 differs depending on your Magento version:
Magento (Commerce Version)
Follow Magento's instructions for activating the Tag Manager at the following link: To the official guide
You don't need to do anything other than follow the steps shown under Step 3. Enter "GTM-KK8SCVP" as the "GTM ID". (This is the official Shoplytics container. Nobody other than the Shoplytics developers gets access to it, in order to protect all Shoplytics customers.)
If you do not want to purchase the GTM plugin, the datalayer can also be provided directly by Shoplytics. However, this requires custom programming for your shop (which is then loaded directly through the Shoplytics script.). The Shoplytics datalayer service is somewhat cheaper than the GTM plugin and can be booked at https://www.checkout-ds24.com/product/592227/.
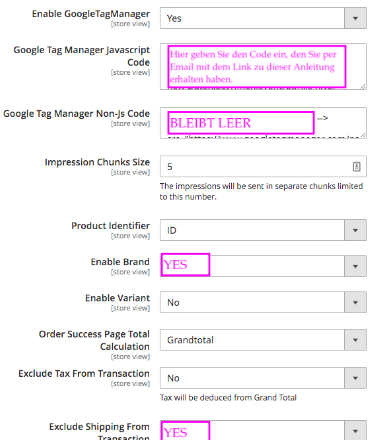
Configure settings as follows: (You will find the tracking key in your email)
Integrate Shoplytics into your shop system
Wix
Log in to Wix and go to the settings via the menu.
Scroll all the way down and click on "Marketing Integrations".
Connect the "Google Tag". You received the required GA4 ID from us via email.
In the next step, the "Google Tag Manager" must also be connected under "Marketing Integrations". Here you enter the ID GTM-KK8SVP. (This is the official Shoplytics container. To protect you and all other Shoplytics customers, no one from the Shoplytics developers has access to this container.)
Now go back to the settings and click on "Custom Code" (This is exactly 2 items above "Marketing Integrations")
Now click on "Edit Custom Code" and insert the Shoplytics code at the very top, which you received from us via email.
For the name, you can simply enter Shoplytics. The remaining settings as shown in the image:
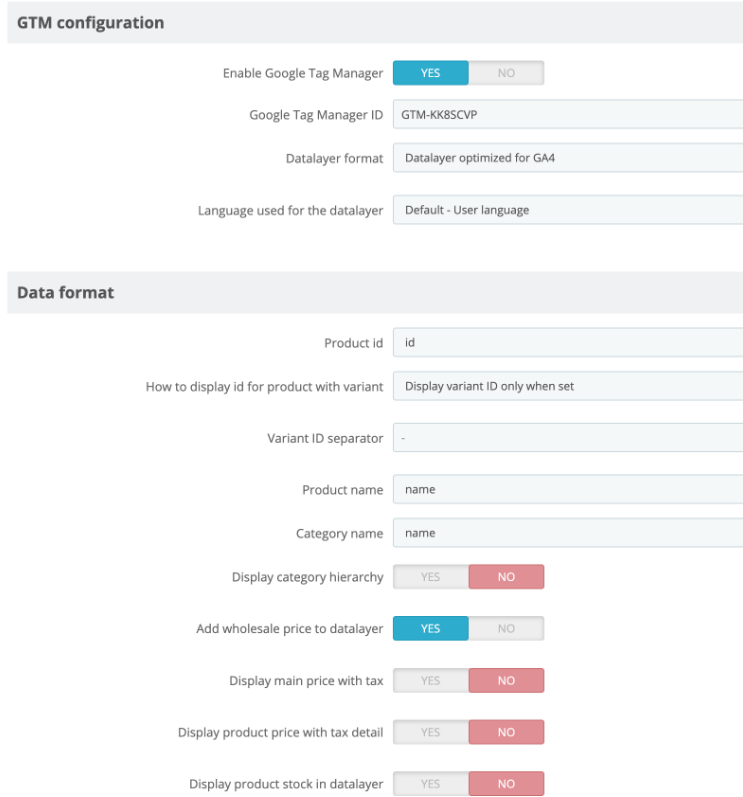
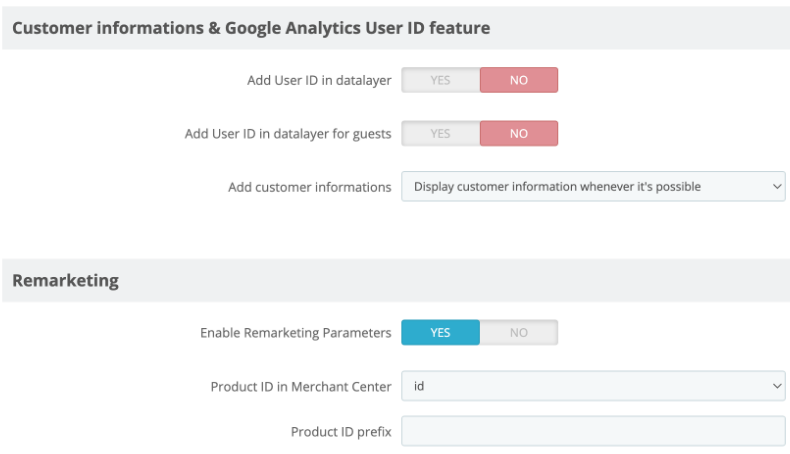
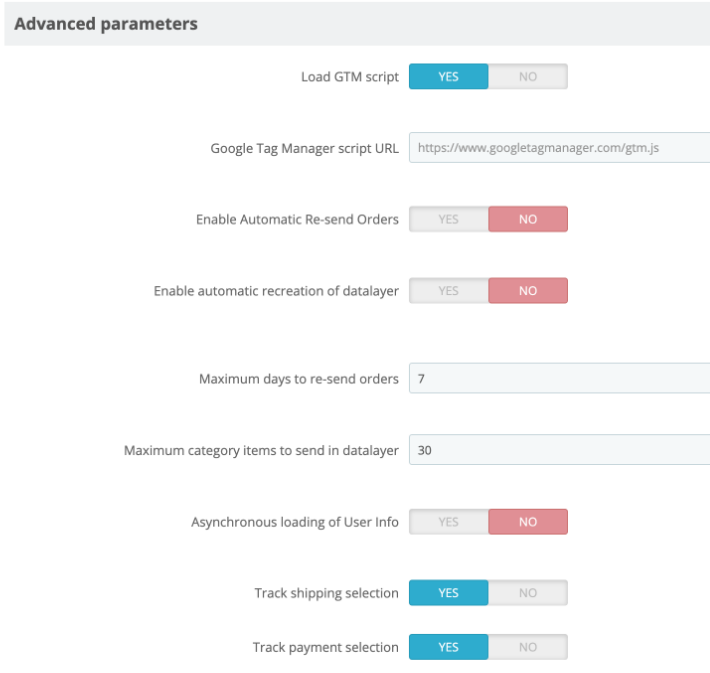
In the plugin, enter the Google Tag Manager ID GTM-KK8SCVP
Configure all settings as shown in the images:
If you do not wish to purchase the GTM plugin, the datalayer can also be provided directly by Shoplytics. However, this requires custom programming for your shop (which will then be loaded directly via the Shoplytics script). The Shoplytics datalayer service is slightly cheaper than the GTM plugin and can be booked at https://www.checkout-ds24.com/product/592227/.
Integrate Shoplytics into your shop system
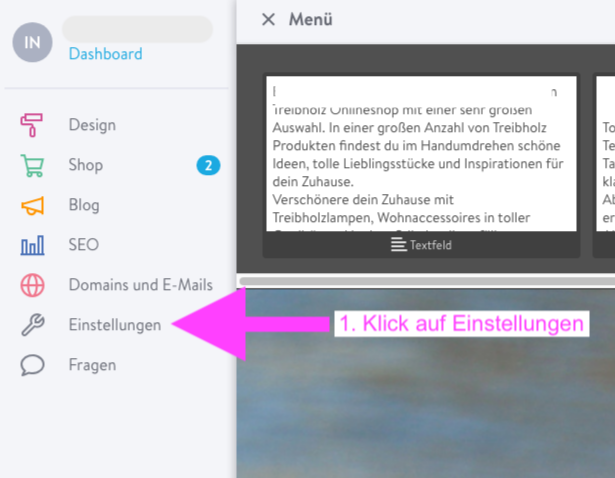
Jimdo
Open your Jimdo admin interface
Click on "Settings"
Click on "Edit Head"
If something is already present in this "Head area" text field, then as a precaution, first make a backup copy of what is already there 🙂. Copy everything that is already in the code area here into a separate text document (on your computer). If you make a typo, or the internet suddenly disappears, you will always have a backup copy.
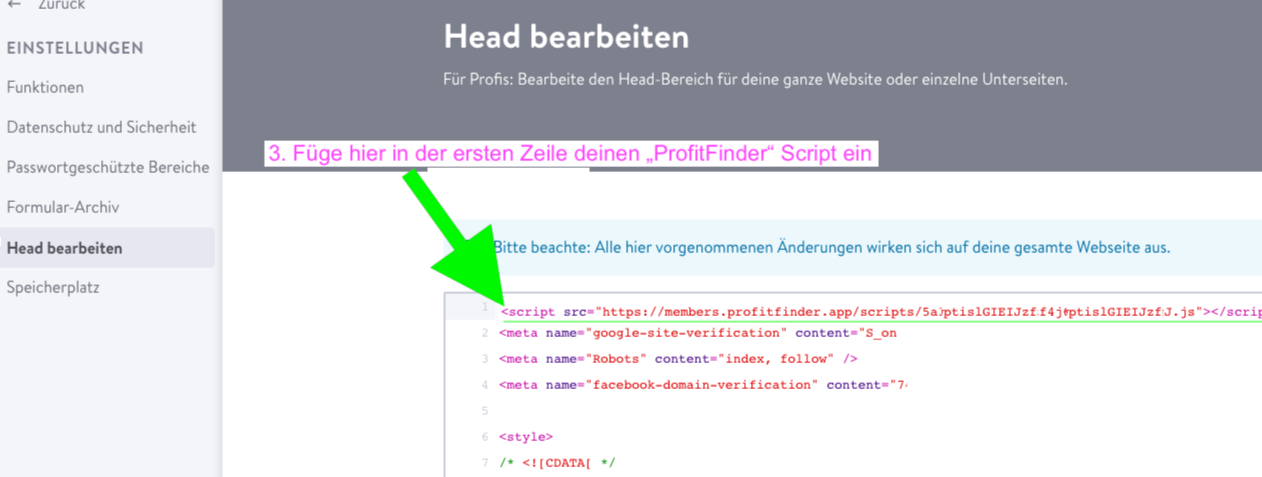
Click with the mouse before the existing text in the head area on the first line (see screenshot below)
Then simply paste the "Shoplytics Code" that you received via email into the first line of the HEAD area.
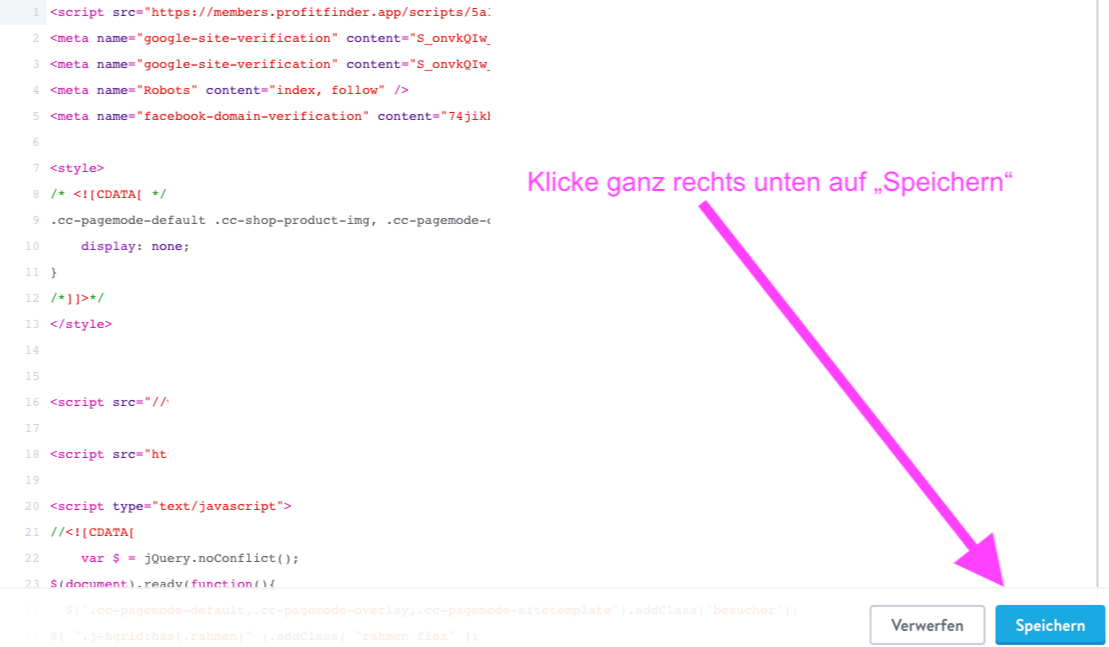
Finally, click on "Save" at the bottom right
Check that everything is working:
If you want to make sure that everything is working, you can proceed as follows.
Call up your shop URL with the following suffix at the end: ?check=1 Example: If your shop URL is: my-shop.com, then call up the following URL in the browser: my-shop.com?check=1
You should then see a large yellow sign in the browser that says: "The Shoplytics script has been correctly embedded in the source code"
If you do not see this sign, then please contact our technical team directly and we will help you further.
Bonus task:
Remove duplicate tracking scripts.
To avoid unnecessarily loading duplicate tracking scripts, proceed as follows:
Remove duplicate "Google Analytics" tracking
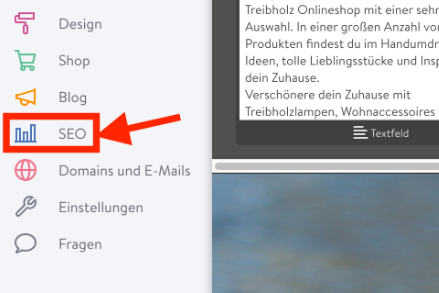
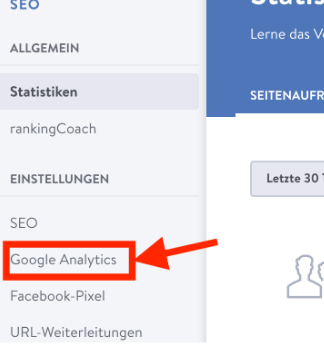
Open the "SEO" section in your shop.
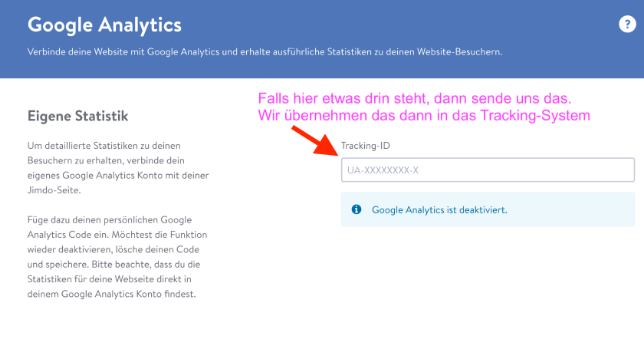
Then click on "Google Analytics"
If there is an account ID in there, then please send us an email with this ID, and we will also include it in the ProfitFinder. This saves loading time and additional code in your shop
Place the Shoplytics code globally in the <head> section of the shop. You received the Shoplytics code from us by email. You can also find it at any time at https://app.shoplytics.de/einstellungen/?tab=skript
Integrate Shoplytics into your shop system
BigCommerce
Install the following plugin. This provides the "Ecommerce Data Layer according to Google Standard". The Ecommerce Data Layer delivers the necessary signals for tracking ecommerce events and product details. https://www.bigcommerce.com/apps/tag-manager-suite/
Place the Shoplytics code globally in the <head> section of the shop. You received the Shoplytics code from us by email. You can also find it at any time at https://app.shoplytics.de/einstellungen/?tab=skript
Integrate Shoplytics into your shop system
Custom development / unsupported shop system
Custom Development / Unsupported Shop System
For Shoplytics to capture relevant e-commerce events in your shop (e.g. view_item, add_to_cart, purchase), it needs a clean e-commerce data layer.
This data layer provides structured information, including:
Product IDs and variants
Categories
Prices and revenue
Cart and order data
In short: Everything that turns visitors into measurable purchasing decisions.
The standard Shoplytics relies on
Shoplytics follows the common Google Analytics data layer standard (GTM version).
For many shop systems, ready-made plugins are already available. That's why our first, pragmatic tip is:
Search your shop's admin area for plugins with terms like
"Data Layer"
"Google Tag Manager"
"GTM"
Many of these plugins provide the required e-commerce data layer right out of the box. If you're unsure whether a plugin is the right fit for you, feel free to send us the link at support@shoplytics.de and we'll quickly check it for you.
Couldn't find a plugin for your shop? No problem.
(PS: You shouldn't have to pay more than 10 euros per month for this ... there are plugins out there that charge ten times as much. That's way too much.)
Especially with more customized setups, it's completely normal for no plugins to be available. That's not a problem either.
In this case, you have two clean options:
Option 1: Data layer implementation by your developer or agency
Your developer implements the e-commerce data layer directly in your shop's source code.
This is the standard approach for:
Custom-built shops
Non-standardized shop systems
Custom product, pricing, or cart logic
(just forward this documentation to your developer)
You'll find the instructions for your developer at the bottom of this page.
Option 2: We'll take care of it for you. Book the Shoplytics Data Layer Service
What you get:
A custom-built e-commerce data layer for your shop
No development effort on your side
Implementation according to the common, future-proof standard
Important: This data layer belongs to you. You can continue to use it independently of Shoplytics, since other plugins and tracking systems also align with this exact standard.
So: Whether from us, a plugin from your shop, or your shop agency –make sure you get a clean data layer based on this standard.
You're not investing in a tool, but in a clean data foundation for your shop.
In the next step, you'll find the original Google documentation on this topic.
Instructions for your developer on how to easily program the data layer
Programming the "DataLayer" and populating it with "Enhanced E-Commerce Data" according to Google's own documentation (You can find the link to the full Google documentation and all possible events at the end of this document.):
You can limit yourself here to the following four events/page views: (Steps 1 through 4 are "mandatory" to start ecommerce tracking)
Viewing a product page (Documentation: "view_item")
Adding/removing a product from the shopping cart (Documentation: add_to_cart, or: remove_from_cart)
Entering the checkout: begin_checkout
Transmission of successfully completed purchases (on the "Thank You page" after the purchase) (See purchase in the Google docs)
Please observe the "required" parameters in each of the data layer pushes in the original Google documentation (links below):
the respective event name (e.g. "view_item" or "purchase")
items > item_name & item_id
currency
value
If you have any questions about the programming, feel free to contact us anytime at:
support@shoplytics.de
Google's documentation on the individual events:
Please have your developer team implement it exactly this way.
(Also see the mandatory parameters in the ecommerce and items objects.)
At minimum, the events: view_item, add_to_cart and purchase are necessary.
It would be better to have all of the following events...
A Shoplytics technician will perform a comprehensive tracking check within 48 hours...
Tip: It's best to send a short email to data@shoplytics.io as soon as you've integrated Shoplytics into your shop system. That way, the tracking check can take place as early as possible.
If any irregularities occur during the tracking check, we will resolve them as quickly as possible and then contact you via email with the next steps.
If the tracking check was successful...
Then we will send you an email to inform you about it and explain the next steps.
When does the onboarding call take place?
After a successful tracking check, we place your Shoplytics account into a 1-week monitoring routine to make sure everything is running as expected.
After this week, we will send you another email with an invitation to the onboarding call. You can then choose a suitable appointment from the calendar.
How do I access my Shoplytics account
After you have booked Shoplytics, a Shoplytics account will automatically be created for the email address you entered during the booking. Therefore, when booking multiple Shoplytics instances, make sure to use a different email address for each order.
For your first login, you can simply click "Forgot password" to set a new password for the account.
In the admin area, you have the option to enter tracking IDs and API keys from additional services, view the Shoplytics courses, and open the dashboard, which will only work after the installation has been completed.
First-Party Tracking
What is first-party tracking?
First-party tracking means that Shoplytics is not loaded as a third-party resource, but rather as if Shoplytics were a core feature of your website.
"app.shoplytics.de" will then no longer appear in the browser console, but only "stream.my-domain.de". The result is that many tracking blockers no longer detect Shoplytics, allowing more users to be captured server-side.
Activate first-party tracking:
To do this, you need to log in to your domain provider and create a new DNS entry for your domain...
Type: CNAME
Name: stream
Value: 1p.shoplytics.de
Check whether it works by visiting the "stream." subdomain of your domain a few minutes after creating it. If the entry works, you will see either the error "ERR_CERT_COMMON_NAME_INVALID" or a Cloudflare page. Now all that remains is for a Shoplytics technician to activate first-party tracking for this new subdomain.
Note: With some domain providers, you need to add a period (.) after the name and/or after the value for the entry to work.
If you use Cloudflare: Enable the "DNS only" option for the entry so that the Cloudflare proxy is not used. Otherwise, tracking will not work properly.
As soon as the entry is active, please send an email to data@shoplytics.io. Our technician will activate first-party tracking.
Connect Shoplytics with many other services
Connect Shoplytics with many other services
Microsoft Ads
To link your Bing advertising account with Shoplytics, please log in to Shoplytics and to Microsoft Ads.
Step 1: Enter Tracking ID in Shoplytics
In the navigation, click on "Conversions" --> "UET Tag" and copy the displayed Tag ID. You may need to first create a new UET tag on this screen in order to receive an ID.
You can then enter the UET Tag ID in Shoplytics under "Other Pixels" --> "Microsoft UET Tag ID".
In addition, also enter your "Microsoft Ads Advertising Account ID" in Shoplytics, which you can find at the top left in Microsoft Ads.
Step 2: Create a Conversion Goal for Purchases
In the Microsoft Ads navigation, click on "Conversions" --> "Conversion goals"
Create a new goal and select "Business Website", then "Manual Setup".
As the category, select "purchase" and click on "Event" below.
Now you can give the goal a name, e.g. "Sale Shoplytics", and select the correct currency.
You can activate Enhanced Conversions and click next.
When asked about the UET tag, select "Yes the UET-tag was already installed on all website pages..."
In the next step, click on "manual installation" and select at the bottom "Track event on inline action".
DONE
Step 3: Connect Conversions API for server-side tracking (required for Shopify, optional for all other systems)
In the Microsoft Ads navigation, click on "Conversions" and search for "Conversions API". If you cannot find it, contact Microsoft Ads support using the following template:
Hello Microsoft Advertising Team,
We are actively using Microsoft Ads and would like to participate in the pilot phase of the Conversions API (for server-side UET tracking).
Please let us know briefly once the button to generate access tokens has been enabled for us.
Currently we can only generate developer tokens in the UI, which unfortunately do not work with the new Conversions API.
Thank you and best regards
As soon as your Microsoft Ads interface shows the button to generate the token for the Conversions API, click it and enter the token at app.shoplytics.de under "Other Pixels".
In the field above, also enter the advertising account ID. (ATTENTION: This is not the ID you see at the top left in Microsoft, but rather you will find the parameter "cid=" in the address bar of your browser, followed by the numeric advertising account ID. This is what must be entered in Shoplytics.)
From now on, no Microsoft Ads pixel will be executed by Shoplytics in the browser; instead, the Shoplytics tracking server communicates directly with the Microsoft server when new events are tracked.
Step 4 (optional): Create Retargeting Audiences
Shoplytics already sends all the necessary data. Now you need to make sure in Bing Ads that the transmitted data can also be used for retargeting.
To do this, create "Audience" lists in Bing Ads.
In the following, I'll show you the setup using the example of "view_item" (product page view).
You then repeat the exact same procedure for all relevant Ecom events:
view_item (Product page view)
add_to_cart (Added to cart)
begin_checkout (Start checkout process/Go to checkout)
purchase (Purchase)
Instructions
Click on "Tools" and then on "Audiences"
Enter the name: e.g. "Shoplytics view_item (Product page viewed)" Select "Remarketing List" as the option:
Select the "UET" tag from the dropdown menu (If you have several, it must be the one connected to Shoplytics.)
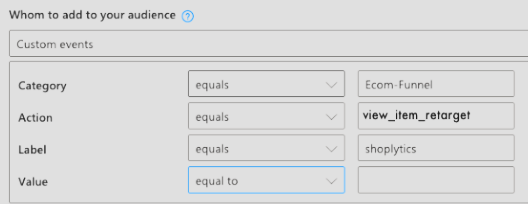
And for "who do you want to add to the list", select "Custom Events"
In the input form, apply these settings:
(You will adjust the "Action" for each individual event - according to the event you are currently setting up). "Category" and "Label" remain exactly the same.
You can ignore the code shown below (you don't need to copy or email it -> Shoplytics has already taken care of everything for you).
You can still change the "Duration", i.e. how long individual visitors remain in the list (after their action in the shop). With this you determine: a) how long you can contact visitors (after their action in the shop) via your retargeting campaigns. b) how "current" the action is for the visitor - and how relevant your ads will be to the visitor accordingly. Here you need to find a happy medium between: a) "I want to stay in contact with the visitor for as long as possible in the future" and b) "a visitor who saw a product 6 months ago surely has less interest in your ads than one who last saw a product in your shop 3 days ago"
Connect Shoplytics with many other services
TikTok Ads
To connect Shoplytics with your TikTok advertising account, log in to TikTok Ads and go to Events Manager --> datasources
Copy the displayed Pixel ID or create a new pixel and then copy the ID.
Here you will find the "TikTok ID" field where you can paste the copied ID. (Make sure that no space has been inserted!)
OPTIONAL: Connect TikTok Conversion API (server-side tracking)
Please create a TikTok API key and send it to data@shoplytics.io so that a technician can activate the API for you.
How do I create an API key?
In the TikTok Events Manager, click on the pixel and then on "settings".
Scroll to the "Access Token Generation" section and click the button to generate a key.
Connect Shoplytics with many other services
Pinterest Ads
To connect Shoplytics with your Pinterest ad account, log in at https://ads.pinterest.com/ and navigate through the menu to "Conversions" --> Pinterest tag --> Tag health.
Enter the copied number under "Pinterest Pixel ID"
Connect Pinterest Conversion API (server-side tracking)
To do this, please generate an access token and send it to data@shoplytics.io so that a technician can activate the API. Please also include your ad account number in this email.
How do I generate an access token?
In Pinterest, go to "Conversions" --> Conversion API --> Set up API
Click on "Generate new token"
Connect Shoplytics with many other services
AWIN
To link Shoplytics with AWIN, you need your AWIN Merchant ID (merchant ID).
Simply send this merchant ID by email to support@shoplytics.de.
We will activate the AWIN integration within a few days.
Connect Shoplytics with many other services
Microsoft Clarity
By default, we create a new property in Microsoft Clarity during the setup of Shoplytics and invite you to this property.
Clarity tracking is therefore automatically active through Shoplytics.
However, if you have already used Clarity before and would like to continue using your old property with Shoplytics tracking, simply send us your property ID from Microsoft Clarity to data@shoplytics.io.
We will then connect this property with Shoplytics.
Connect Shoplytics with many other services
Meta Ads / Facebook Ads
Important note:
We strongly recommend creating a new pixel rather than connecting your old pixel to Shoplytics. Otherwise, duplicate events and issues with the campaign algorithm may occur.
If you are sure that you want to use your old pixel, you can simply skip the first steps of this guide. But you can't go wrong with a second pixel.
Instructions:
Log in to your Business Manager at business.facebook.com. (If you don't have a business account yet, you can create one on this page. Your ad account and pixel are just "assets" that sit within your business account.)
On the left, click "All Tools" --> "Events Manager" and then click "Data Sources"
Click the green "+ Connect Data" at the top left to create a new data source.
Select "Web" as the type
Enter the domain followed by "Shoplytics" as the name.
In the next step, Facebook will offer you implementation instructions. You can ignore and close this.
Click on Settings at the top right
Copy the "Dataset ID"
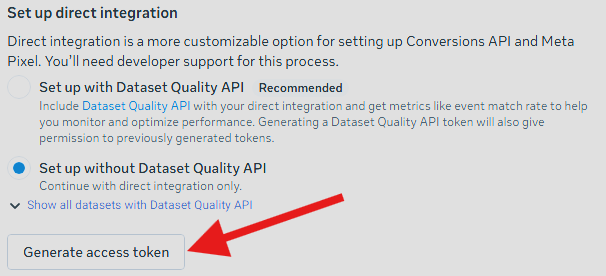
Scroll down to "Set up direct integration" and generate an access token without "Dataset Quality API"
Send these two pieces of information to data@shoplytics.io so we can activate the integration.
In the pixel settings, also click "Share with ad account" so that the audiences work.
Enabling error monitoring:
So that we can check whether the pixel is being supplied with data correctly, you should definitely also grant the Shoplytics team access to the pixel and the ad account.
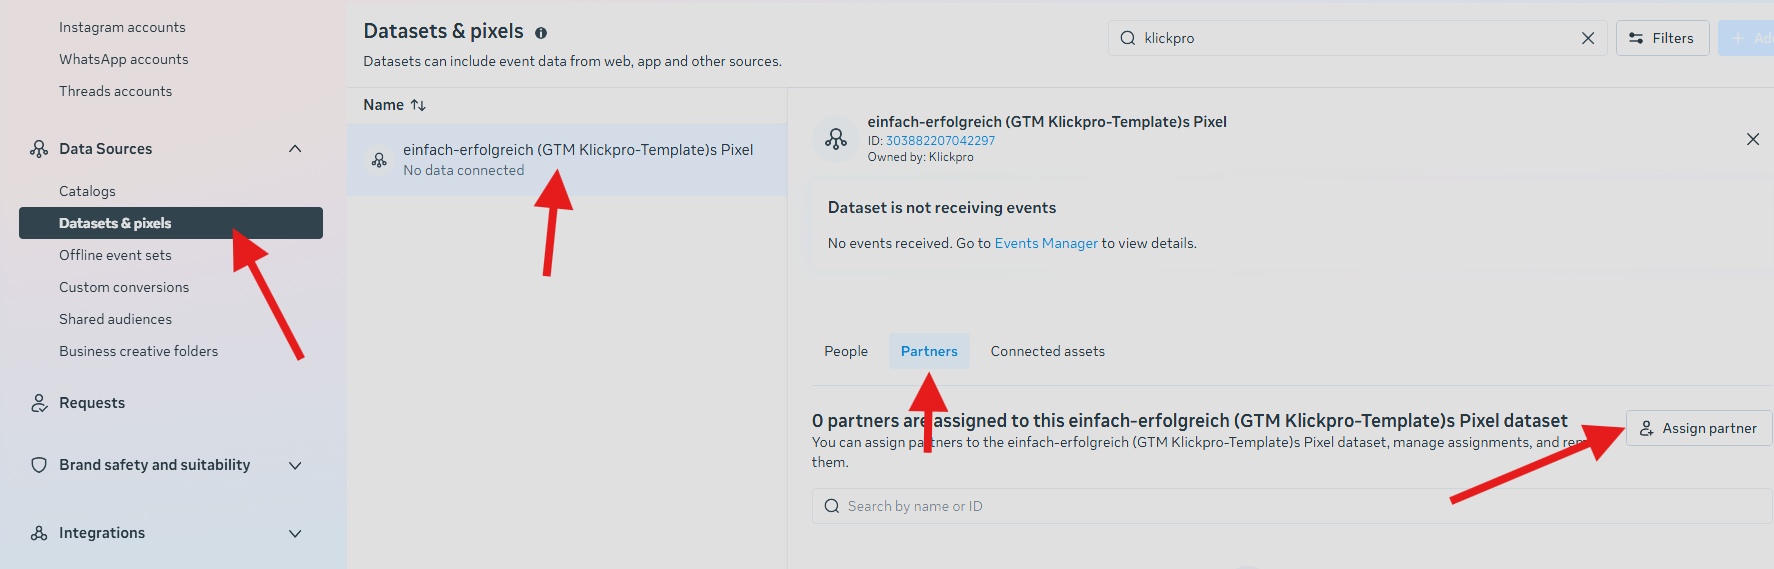
To do this, simply go to Business Settings --> Datasets --> Assign Partners --> grant access to business ID 1800068976920756.
Connect Shoplytics with many other services
Google Merchant Center
Log in to Google Merchant Center and make sure that the correct merchant profile is selected in the top right.
Go to the bottom left to Settings --> Access and services
Click the upper "Add person" button and add data@shoplytics.io.
For the permissions, you can leave the default settings and submit.
Snippet for privacy-notice
Privacy-First Tracking with Shoplytics®
Why Privacy-First?
In e-commerce tracking, there is simply no benefit to identifying an individual visitor. Shoplytics thinks in traffic streams, not people. What drives decisions is understanding which channels, campaigns, and sources are delivering results — and for that, you need an anonymous mass of visitors, not personal profiles. There is no need to capture private information. So we don't.
How Privacy-First?
1. Shoplytics is invisible in your visitors' browser. Every script runs under your shop's own domain — not ours. Shoplytics never appears as a third party in your visitors' browser. As far as your visitors are concerned, they are interacting with you and only you. This means the data controller is unambiguously you — the shop operator. Not Shoplytics.
2. Only anonymized data. Always. No names, no emails, no personal details. Just anonymous signals — a visit, a click, a conversion — with nothing attached that could identify the person behind it.
3. Shoplytics is merely a moving company for data. We move data — from the browser, directly to your endpoints: Google Analytics, Google Ads, Meta, or whatever platforms you have connected. We pick it up, we deliver it, we leave no copy behind.
4. Shoplytics never saves, stores, or retains your data. Shoplytics manages anonymous data streams directly in the browser. No data is saved on Shoplytics servers. No data is retained. Nothing is written, logged, or preserved anywhere outside of the visitor's own browser session.
Who is the Data Controller?
You are. Always. Exclusively.
Because Shoplytics never appears in your visitors' browser, and all scripts run under your own domain, your shop is the data controller at every point in the process. Shoplytics is the infrastructure that makes data delivery reliable — nothing more. We are not a data controller. We do not appear as a third-party processor in the browser. The legal and compliance relationship is between your shop and your visitors, exactly as it should be.
What About Sensitive Data?
The only moment any transaction-related data briefly enters the picture is on the order confirmation page — where, with the customer's consent, a completed purchase is attributed to the correct marketing channel. Even here, Shoplytics captures, cleans, and forwards the data directly to your configured endpoints in real time. It is never written to a Shoplytics database, never logged, and never accessible to Shoplytics in any persistent form.
For businesses in sensitive sectors — including healthcare — this means no unnecessary data exposure, no compliance overhead beyond what your own platforms already require, and no additional risk surface introduced by a third party holding your customers' data.
Privacy Policy Template
The following template has been found helpful by customers in the past when documenting Shoplytics in their own privacy policies. Use it as a starting point — but make sure to review it with your legal counsel before publishing.
Use of the Shoplytics® Data Management Solution on this Website
IMPORTANT: This is not legal advice. This text must be reviewed by a data protection officer or legal adviser before publication.
Purpose and Functionality
This website uses Shoplytics®, a data management solution. Shoplytics® serves as the technical control layer for coordinating and managing various web-based functions — and, following explicit user consent, for activating analytics and marketing technologies such as Google Analytics, Google Ads, and Meta Pixel.
Shoplytics® is designed to ensure data-efficient, performance-optimised, and structured execution of these technologies. It supports in particular the privacy-compliant control of tracking and analytics scripts, load time optimisation through intelligent script management, a clear separation between technically necessary functions and those requiring consent, and the secure implementation of consent requirements.
Technical Operation and Data Handling
Shoplytics® operates as a technical control layer and does not store personal data on its own servers. Data is forwarded directly to your configured endpoints — Google Analytics, Google Ads, Meta, or any other connected platform — without being retained or saved at any point in the process. Network connections initiated by Shoplytics® serve primarily to load technical control resources such as configuration files and script logic. Tracking and marketing technologies are activated through Shoplytics® only following valid user consent.
Prior to consent, no analytics or marketing services are activated, no personal data is transmitted to external tracking providers, and no user profiling or behavioural analysis takes place. In particular, no IP address is transmitted to external tracking or marketing providers prior to consent. The Google Tag Manager is not loaded directly from Google servers, but exclusively through a technically controlled first-party proxy — for example via a subdomain such as stream.your-domain.com — enabling privacy-friendly integration within your own infrastructure.
Storage of Technical Information in the Browser
Shoplytics® stores technical state information in the visitor's browser localStorage — for example under the key "shoplytics_dsgvo_no_track". This information is used exclusively for managing consent status, technical control of script activation, bot detection, and load time optimisation. No personal data is stored in this process.
Legal Basis
The initial loading of Shoplytics® takes place solely to perform technically necessary functions, in particular consent management, system stability, and the control of privacy-relevant processes. This is based on § 25 Para. 2 No. 2 TTDSG (strictly necessary for the provision of a telemedia service) and Art. 6 Para. 1 lit. f GDPR (legitimate interest in privacy-compliant, secure, and performance-optimised website operation). Activation of tracking, analytics, or marketing technologies takes place only following explicit consent under § 25 Para. 1 TTDSG and Art. 6 Para. 1 lit. a GDPR.
Clear Separation: Technical Functions vs. Tracking
Shoplytics® handles both core technical functions and — following consent — the management of optional tracking services. Technically necessary functions requiring no consent include consent management and GDPR compliance, technical control of script activation, performance optimisation, and security and stability measures. Functions requiring consent — and technically blocked until consent is given — include Google Analytics 4, Google Ads Conversion Tracking, Meta Pixel and Meta CAPI, and any other configured marketing and analytics services.
Summary
The initial integration of Shoplytics® serves exclusively to implement technically necessary and privacy-relevant control functions and is therefore permissible without prior consent. Actual processing of personal data by analytics or marketing systems takes place only following explicit user consent via the consent banner. Users may withdraw consent at any time without any disadvantage in using the website. The use of Shoplytics® is fully compliant with the requirements of the GDPR and TTDSG.
Frequently Asked Questions
Is Google Analytics 4 used in Advanced Consent Mode? This is possible and recommended for improved data quality. The consent mode configuration depends on your individual setup.
Are Google Signals active? This depends on your Google Analytics configuration and should be reviewed with your analytics provider.
Is Google Analytics 4 used with cookies? This depends on your setup. Meaningful use without cookies is significantly limited.
Is server-side tracking in use? Yes, as part of a first-party setup via your own infrastructure — for example via stream.your-domain.com.
Are Enhanced Conversions used in Google Ads? This depends on your individual Google Ads configuration.
Is Meta CAPI used in server-side tracking? This depends on your individual setup and connected platforms.